Google
 

Friday, May 30, 2008

Fun-Filled Friday: Caterpillars and Butterflies

In the spring, it's a good time to introduce the life cycle of a butterfly to children. The good news is, there are many activities to choose from. Here are some activities that I have used or recently discovered.


I don't think a lesson about caterpillars and butterflies would be appropriate without reading The Very Hungry Caterpillar. What a fun book to read and the children enjoy watching the caterpillar eat his way through the book.


I found these sequencing cards at DLTK. These go along with The Very Hungry Caterpillar. DLTK allows you to print these out in black and white or color. I chose to print these in black and white so that the children could color them. This is a great counting activity too.


This butterfly is a simple craft for young children. You just take paper scraps or foam cut outs and put them inside a plastic sandwich baggie. Bunch up the baggie in the middle and wrap a pipe cleaner around it and form the antennae with the pipe cleaner. Slide a pony bead over the antennae to keep it all held together. This idea is from Mailbox Magazine.


This is a cute keepsake. It's a bit messy though when you try to do this with 13 kids! lol To make this butterfly, you simply apply paint to the child's feet and then stamp them onto cardstock or heavy paper. Then use brown construction paper to cut out the butterfly's abdomen and glue it to the wings.

Warning: It's best not to have the kid's watch as your press their foot down on paper. If they're looking at the paper, they'll almost always wiggle their foot around. I found it easier if I had them look at an object while I pushed down on their foot.


I was fortunate enough to find this kit at Dollar Tree many years ago. These figurines show the different phases of the life cycle. I'm sure you could pick up one of these kits at your local teacher store or online.

More ideas:

Foam caterpillar: Sorry, I don't have a picture of this one. I remember making this several years ago though. I just took different colors of craft foam and cut out circles that were about the size of a quarter. We glued these together to make a caterpillar and then added wiggle eyes.

Collage: Use paper scraps, yarn, fabric, tissue paper, clips from magazines, etc to create a butterfly collage.

Life cycle booklet: Cut a piece of paper into 4 equal pieces. On the first page draw a leaf and then glue a small white circle onto the leaf. Use a hole puncher to punch out the circle - you can use white paper or craft foam for the circles. This is for the egg. On the next page, draw a leaf and then glue on a spiral shaped noodle for the caterpillar. On the third page, draw a tree limb and then glue on a shell shaped noodle for the chrysalis. On the last page, glue on a butterfly shaped noodle and also draw the body of the butterfly. Of course, you can add flowers, trees, and other embellishments to your book.

Do you have any caterpillar or butterfly ideas to share? Have fun!

Read More...

Tuesday, May 27, 2008

Subway Discriminates Against Homeschoolers


Subway is offering students a chance to participate in their contest, unless they're homeschooled.

Contest is open only to legal US residents, over the age of 18 with children in
either elementary, private or parochial schools that serve grades PreK-6. No home schools will be accepted.
Way to go, Subway. Let's see what kind of bad publicity you can get for this one. Read it for yourself here.

Update 5.28.08
Subway issued an apology today to homeschoolers. They said in the future that they would make sure the promotions were open to everyone.

Read More...

Our Trip to the Science Center

A few weeks ago, we took the kids to the science center. My favorite part was when they fed the sharks. I got some great video of it. You can also see some pictures that I posted at Thrifty Mommy.

Don't forget to check out the ocean crafts that I posted last week.

Read More...

Friday, May 23, 2008

Fun-Filled Friday: Fun Ocean Crafts

My daughter's preschool class has been learning about the ocean this week. Here are some things they made that I thought you would like to see.


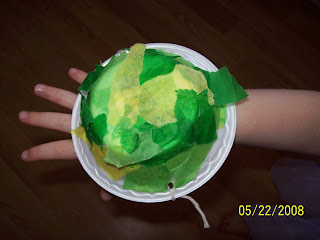
This is a turtle. It is made from a small styrofoam bowl. Just tear up some pieces of green tissue paper and glue it to the bowl. There is a hole punched on each side of the bowl with a string tied to each side. This allows the turtle to attach to the child's arm so that they can pretend their hand is a turtle.

I made something similar a few years ago with my preschool class. I used a larger bowl and cut out a turtle head, arms, legs, and tail for each child. We glued these to the bottom of the bowl. Just another option for you.

This is sort of an ocean in a bag. This uses blue ziploc bags (I think the freezer ones are blue), glitter, foam fish, and I think the jelly material inside is liquid petroleum jelly. Otherwise, I would suggest using clear or blue hair gel.

For this, you need to cut a circle from cardboard/tagboard or cardstock. Cut out a small triangle for the fish's mouth and glue the triangle onto the fish for a tail. Then glue on some glitter and add a large sequin eye.

All of these activities are easy enough that you could do these with ages 2 and up. Is anyone having an ocean theme for Vacation Bible School this year? If so, these would be easy and inexpensive crafts.

Don't forget to check out this awesome National Geographic video to go along with your lesssons.

Have fun!

Read More...

Tuesday, May 20, 2008

Family Devotional Time


Each night, our family reads the Children's Bible together. We also pray and sing songs. Tonight, my 4-year-old wanted to make up her own song.

tune of "Are You Sleeping?"

Here is Jesus. Here is Jesus.
He loves us. He loves us.
He is God's Son. He is God's Son.
Yes, He is. Yes, He is.

Pretty good for off the cuff. That's not the best part though. My daughter's understanding of God and our relationship with Him is so remarkable. This is an example of her prayers.

"God, we love You, but You love us more than we could ever love You. We believe in You, even though we haven't seen You. Sometimes we mess up, but we want to be more like You. Help us to do better. We thank You for everything You've given us."

How awesome is that? It makes me so proud. I just wanted to take a moment to share this with you all.

Read More...

Friday, May 16, 2008

Fun-Filled Friday: Nurture Your Little Artist


Children develop numerous skills while completing art projects. It does make quite a big mess, but it's worth it. Wait . . . did I just say that? lol

Here are some ways to help your child develop their fine motor skills, spatial awareness, and to stimulate their senses.

1) On a warm day, take your child outside and give him a bucket of water and a paintbrush. See what kinds of pictures and creatures your child can paint.

2) Read together and enjoy books with different illustrations. Try to create your own art using the techniques from the book.

3) Provide a place for your child to work. Furnish it with supplies - tape, crayons, markers, glue sticks, child safe scissors, etc. You may need to use a small bookshelf or plastic totes to help keep their supplies.

4) Finger paint with food. You can use chocolate pudding, applesauce, Gogurt, icing, whipped cream, etc. Give your child a cookie sheet to work on or cover the table with a clean vinyl tablecloth. It's ok to taste your creations!

5) Have a box of junk to use. Put those film canisters, toilet paper rolls, paper towel rolls, small boxes, scrap paper, and cardboard packaging into a box for your kids. Let them glue them, connect them, build with them, etc.

6) Make edible art. Use pretzel rods, gumdrop candy, marshmallows, fruit roll-ups, plastic straws, coffee stirers, crackers, etc. Make shapes or buildings. Just have fun!

7) Play with edible playdough. Here are a few recipes to get you started.

8) Glue a random object to a piece of paper and let your child create something. The object used could be a leaf, shape, sticker, etc.

9) Make creatures out of fingerprints or handprints. Give your child some washable ink and let them make fingerprints on paper (younger children will need help). Encourage them to make butterflies, bugs, dinosaurs, and other creations from the prints.

10) Save your spray bottles and fill them with diluted paint. Let children use them to spray poster board, cardboard, etc to make their unique picture.

11) Keep a supply of old magazines in the art station. Encourage children to cut out pictures to make a collage about families, food, animals, cars, etc.


12) Allow children to paint with different objects. Some suggestions are cookie cutters, string, toy cars and trucks, golf balls, marbles, straws, fingers, different sized brushes.


Other tips:

When I was teaching, we would use old newspaper and vinyl tablecloths to protect the tables. Old shower curtains also work well to protect the floor.

When the children were finished with their artwork, I would put it on an old shower curtain to dry. If the paper was big, I would hand it on an indoor clothes drying rack (with shower curtain underneath to catch drips).


What fun artsy activities do you enjoy with your children?

Read More...

Sunday, May 11, 2008

Happy Mother's Day!

To the tune of Happy Birthday

Happy Mother's Day to you
Happy Mother's Day dear _______
Happy Mother's Day to you

In the blank you can use Mommy, Grandma, Mawmaw, or someone's name.

Happy Mother's Day everyone! :)

Read More...

Tuesday, May 6, 2008

The Carnival of Homeschooling

The Carnival of Homeschooling is up at Melissa's Idea Garden. There are a lot of submissions this week. Stop by and check out all the great ideas.

My post about making your own games is included in the carnival. :)

Read More...

Friday, May 2, 2008

Fun-Filled Friday: Fun Recipes

Here are some recipes that I have on file. Hope you enjoy them.

Homemade Playdough Recipe #1

3 cups of flour
1 1/2 cups of salt
3 cups of water
2 Tbsp of vegetable oil
1 Tbsp cream of tartar
food coloring or 1 package of unsweetened Kool-Aid

1) Mix all ingredients in large saucepan over medium heat until dough comes away from the edge. Remove from heat.
2) Knead 3-4 times and store in an air tight container.

Homemade Playdough Recipe #2

1 cup flour
1 cup warm water
2 teaspoons cream of tartar
1 teaspoon oil
1/4 cup salt
food coloring of choice

1) Mix all the ingredients, adding the food coloring last.
2) Stir over medium heat until play dough has a smooth consistency. Remove play dough from the pan and allow to cool for a few minutes (we always put ours on an empty desk in the room away from the children).
3) Knead until smooth. After it has cooled, place it in a plastic bag or airtight container to keep it soft.

Edible Peanut Butter Playdough

2 cups peanut butter
6 tablespoons honey
nonfat dry milk or milk plus flour
cocoa or carob for chocolate flavor (optional)
edible treats for decoration

1) Combine all ingredients in a bowl and mix, adding enough dry milk or milk plus flour to reach the consistency of bread dough.
2) Add cocoa or carob, if desired.
3) Shape, decorate with edible treat, and eat!

Edible Frosting Playdough

1 can frosting mix
1 1/2 cups powdered sugar
1 cup creamy peanut butter

Mix together until it reaches your wanted consistency.

Oobleck

1 1/2 cups corn starch
1 cup water
green food coloring (few drops)

Mix the ingredients together and allow children to play with the mixture. When pushed together, the mixture will appear dry and solid; as children let go of the mixture, it flows like smooth liquid.

I have another recipe for Oobleck here.

Read More...